Showing posts with label diy. Show all posts
Showing posts with label diy. Show all posts
Monday, March 16, 2015
Giveaway
Saturday, February 28, 2015
Project Life Instagram Giveaway!
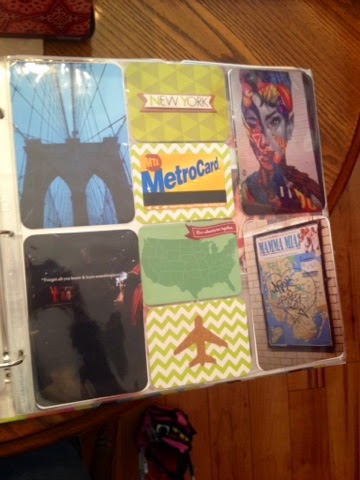
I love giveaways especially when it involves crafting! I won an amazing Travel Pack from Crate Paper on Instagram. It is 100% my style and I have used a little bit of the pack on my travel pages. Have a few ideas for pages from California as well. The set is called Journey and it is adorable! It has tepees, glampers, arrows, and more. Below are a few of the pages I have made with my pack! These are pages from NYC and New Orleans!
Labels:
crafts,
crate paper,
diy,
paper crafting,
Project life,
scrapbook
Wednesday, December 24, 2014
Wooden Christmas Tree DIY
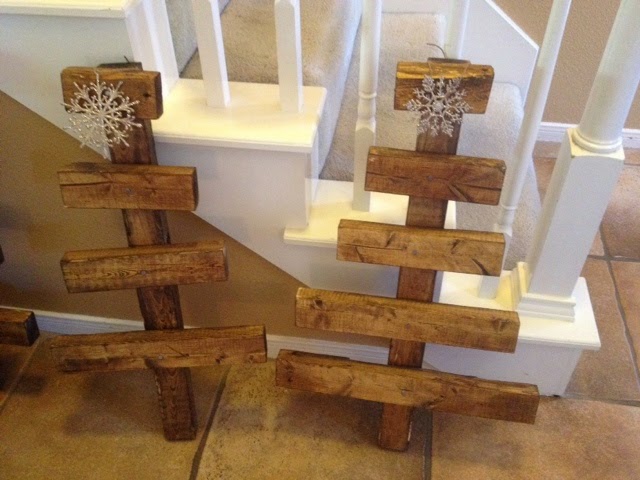
I have had this on my crafting to do list for a long time! Every time I'm looking through Pinterest at Christmas DIY projects this comes up. I wanted to do a pallet Christmas tree but I realized that it would be easier to just go to Lowes and have them cut it for me. I came up with measurements for small trees and liked how they turned out. I made 7 trees total 1 has 5 layers and the rest have 4. Below are measurements.
30" 7 pieces
20" 1 piece
15" 7 pieces
10.5" 7 pieces
8" 7 pieces
5.5" 7 pieces
Here I put out all the wood by size.
I used butcher paper to stain the wood on. The stain I got was dark which was perfect because I only had to do one layer.
Labels:
Christmas,
Christmas craft,
christmas diy,
Christmas tree diy,
diy,
pallet Christmas tree,
pallet diy,
pallet tree
Wednesday, December 10, 2014
Beer Carrier DIY
Supplies:
1/2" dowel 10" long
32" of 1"x6" pine board 32" long
1/4" plywood 3'x3'
Wood stain
Wood glue
Tape measure
Saw
Sandpaper
Nail gun
I started at Home Depot and had them cut down the pine wood into 4 pieces of 5 1/2''x11'' and 2 pieces of 5 1/2''x10''. Then I measured out the ply wood and drew lines for cutting. The plywood pieces hold together the outside part and act as beer barriers.
I got the plywood out and drew where I would be making cuts. I numbered how many of each size I would need.
Then I got the pre cut pine wood and determined how to cut for the side boards. I took the 5 1/2"x11" pieces and drew lines to be cut. I drew a line at 2" and 3 1/2" across the top. Then I measured 4" down and marked those as well. I met the lines where I would be cutting.
Once you get all the measurements down it's time to cut and sand!
When everything is nice and smooth it's time to stain the wood. I did about 2-3 layers since my stain was a light color. Once everything is dry it's time to assemble.
We did a combination of wood glue and nails to assemble.
The finished product is pretty awesome!
Labels:
beer carrier,
diy,
DIY woodworking,
wooden beer holder
Monday, December 8, 2014
DIY Chalkboard Wine Glass Gift
Every year my family goes all out for Craftmas. Yes you read that correctly we craft hard! One of the easier gifts I wanted to make were cute chalkboard wine glasses. I wanted to make them like the nail kit mason jars but in a wine glass. They were super easy to make and everyone loves chalkboard paint right?
Supplies:
Wine glasses
Chalkboard paint
Painters tape
Sponge brush
Start by taping the glasses where the stem meets the bottom. Paint a layer of chalkboard paint and let dry completely. I did two coats to make sure there weren't any streaks. Wait till the paint is completely dry before removing the tape. Fill with whatever treats you want and write your gift recipients name in chalk!
Sunday, October 12, 2014
Dollar Spot Crafting
I love to craft and making cards is one of my favorite things to make. I haven't been able to craft since I left my apt in September. That is like a lifetime of not crafting for me! I didn't bring any supplies and didn't want to buy a bunch of stuff to re stock my crafting supplies. Luckily Target dollar spot and a huge sale at Michaels saved the day!
Michaels had their colored 80 card and envelope packs for $5. They also had all 50+ Card and envelope packs half off so they came out to $4-$5 as well! Target had $3 stamp sets with ink pads, $1 chalkboard stickers, chalk, gel pens, twine, bakers twine, washi tape, mini clothes pins, and more tiny craft supplies. They also had a lot of smashbox paper sets for $1! I hit the jackpot on cheep crafting supplies! I think the total ended up being under $20! Here is a look at some of the supplies I got and some card creations!
Labels:
card DIY,
craft,
diy,
fall,
fall craft,
michaels,
target,
target dollar spot
Subscribe to:
Posts (Atom)


